Featured

Home Networking

Welcome to the Home Network

Home to my home networking blog and all the things I am trying to connect at home–dipping my toes into the IoT.

Why

I have decided to start this blog as a way to communicate all the issues and nuances I have faced and the solutions on getting my current network up and running. At one point, I just had the ISP modem and router combo but was limited to what the ISP’s router functionality. I have never been a fan of an Arris router so I decided to upgrade.

Me


My name is Shane Walradt and I am a Network Engineer and Retired Army Veteran. I have been practicing Information Technologies in some form or another for a better part of 22 years. My goal is to give insight into what a network engineer does at home. Other than drive his/her family nuts.

My Network

undefined
My network consists of the typical ISP router modem but in passthrough mode so as to allow my home router, a Cisco ISR 1900, do all of the network lifting. This is connected into a Cisco 3750 switch that hosts the port density to drop my Netgear Nighthawk in AP mode, a Dell R610 running ESXI 6.7 hosting my Virtual Machines, Synololgy NAS, and a cabled in host.

Caveat

Everyone does things differently, even in an environment where the OSI model and the TCP/IP Stack will govern the standards. Most of my blog posts will have comments turned on and I look forward to each of your insights into how to do something different. As with everything, the above network is a work in progress and will change drastically.

Mastering Spanning Tree (attempt 100)

Introduction

While I was working on my Masters degree, I wrote a paper called “The Death of Spanning Tree.” I went into great detail on Spanning Tree and its many different flavors and uses then went on to explain that TRILL and FabricPath were going to kill it off. Well that paper was written in 2012-2013ish and Spanning Tree was old then, almost 10 years later, its very much alive. Maybe as a follow-on, I will post that paper here, if I can find it. That was so long ago. It surprised me, last year, when I went on to a work site and the lead engineer was establishing a spanning tree network with the numerous switches running through out the site. So, I had to really rub quite a bit of rust off of the subject and go back to drawing board.

Let me reiterate a bit on the previous statement about using STP on a job site. STP is enable by default on all switches. Normally the styles of layer 2 networks I work with are a bunch of switches either daisy-chained together or one switch running in star topography with multiple switches connected. Very rarely will I see a network where STP has to managed over trunk ports.

I used a GNS3 lab to go through all of the configurations and attempt to commit them to memory (not as easy as it used to be). In doing so, I ran into problems with one or two commands actually crashing switches–especially when enabling bpdufilter on a network with 3 routers and 4 switches all interconnected.

I am also going to throw a small paragraph on security concerns and possible solutions at the end of each section to hopefully drive a conversation to my small audience (to quote my daughter “sadness”).

802.1D

This is your bottom dollar spanning tree; typical listening, learning, blocking or forwarding, and disabled going on with a time interval ( about 30 seconds total to the forwarding state). Bridge Protocol Data Units (BPDU) are sent out every 2 seconds. Yes, STP is a very chatty protocol. On my initial lab, made up of 4 switches all with multiple interconnects, STP was enabled by default on all the switches. The switch with the lowest mac address is elected as the root bridge if they have equal priorities, which is a default of 32768.

Those of us who are used to a great deal of VLANs on a network, STP priorities are set at a per VLAN basis. So this can get crazy when attempting to delegate what switch you want to utilize as the root bridge for a chatty protocol going across your network–depending on the flavor that’s 45-47 bytes sent to a layer 2 multicast address every 2 seconds.

One thing I would like to mention that STP costs are also dictated by port speed. For those 100 Mbit/s FastEthernet ports its 19 and for those more typical 1 Gbit/s ports its a cost of 4.

Commands to know:

global:
spanning-tree vlan priority <– in multiples of 4096
spanning tree vlan root primary diameter <–n=max number of switches in a path–command calculates the optimum max delay and forwarding delay time values based on the size of the switched network spanning-tree vlan root primary <–sets this switch as the root for this vlan spanning-tree vlan root secondary<–sets this switch as the secondary root for the vlan

Per Interface
spanning-tree vlan port-priority <–n=older switches in increments of 16 max 240 my network was in increments of 32 with a max of 224

Security Concerns: The biggest concern is the ability to connect rogue switches to the network and hijack the entire STP domain especially with an older switch with a lower priority network. This makes the switch the root bridge and can give an attacker access to sniff all traffic. Fixes are to disable all unused ports and make sure they are assigned to a blackhole VLAN. Because all Cisco Switches have dynamic desirable mode enabled by default on all ports, makes this critical to protecting your layer 2 infrastructure.

RSTP

Technician Vs. Management

First, let me start this by saying that everyone is a leader in their own way. Whether its by leading a group of people via assumed or granted responsibility or by actions. What I mean by this is simple. The first example is easy to understand. We all have people we report to, our bosses. These people hold us accountable for how we support the organization we work for. The second example is a bit more cloudy. What I mean by ‘actions’ are how we as people carry our selves and gives an example the herd mentality. I chuckle at this saying, but my mom would give the, “if they jumped off of a bridge, would you too,” metaphor. But, if it means a gain or a shortcut to that gain, just maybe we will jump off of that bridge. But I digress–what do I man by Tech Vs. Management?

Technician

A technician, per Webster, is a person employed to look after technical equipment or a person skilled in the technique of an art or craft. Technicians are masters of their trade or craft. Because this is an IT blog, that’s the craft I will stick to. Technicians are the skilled workers that management can rely upon to complete a task correctly and efficiently. I will say technicians are not engineers. More on that later.

Management

Managers/Management are responsible for controlling and administrating a part of or all of the company or organization, per Webster. These are the people the decision makers in the company. Do we go with this particular technology or do we take on that particular client or contract, are examples of the types of decisions managers make.

VS.

But can someone be both a technician and a manager? In the last 10 years I was in the Army, I was a Technical Warrant Officer. Looking at the definition above and the responsibilities written in some of our duty descriptions, they don’t align at all. I could argue that a small population of technical Warrant Officers could very well be labeled as engineers and not just technicians. Back to the initial question, I think its possible but without a good team of technicians somethings suffer in both realms. In IT, managers have to be extremely technical to be successful in their field. They have to speak the language of both technicians and other managers.

In those last 10 years in the Army, I found myself juggling leading a team, and being an expert in my field. Though stressful, I was able to surround myself with a really good team. That allowed me to focus on the challenging problems as well as leader engagements like that pesky command and staff or the MDMP meetings, and more importantly, expectation management. Doing both roles wore on me quite a bit though. I sacrificed time with family to make sure I had enough time in the day to accomplish both tasks. But, in the Army you have to have a balance because in those roles, one without the other becomes a dice roll on personal and team success and lives depend on that success.

In the corporate world, what I have noticed is most technicians, and even engineers, have a very narrow field of vision. They focus on the tasks they are given, the problems they need to fix, or the development processes. Management can’t have a narrow field of vision at all, they have to see the big picture to make decisions on whether or not what the technician is working on is still viable, needs to be steered in a different direction.

What I am not saying is that both cannot be done by the same person. There has to be some expectation management on doing both at the same time doesn’t impact another portion of life or well being.

Anyway, just some thoughts. Thanks for reading and I look forward to your responses.

Cisco CE: Holy $#!@, That’s Awesome

Those of you that have immersed themselves into the Cisco Certification realms, understood that just about everything changed on February 24th, 2020. Cisco decided to change all of their certificates and their certificate learning tracks. The one big change that most of those trying to break into the Cisco certificate realm noticed was that ICND I and II went away.

Honestly the changed that took me by surprise and one that I didn’t see a lot of advertising on, and the change that has the biggest impact to those with current certificates, is Continuing Education. In the past, the only people that could enroll in the continuing education program for Cisco, were those that held the CCIE certification(s). On 24 February that all changed. Now Cisco is offering their CE program for every level of certification.

HOW TO ENROLL:

This was a little hard to wade through on how to enroll. I would go to Cisco’s Certification track website https://cisco.pearsoncred.com/ and see a check box under my CCNA and CCNP certs, the new ones titled “Continuing Education” but I could not select them. Of course the CE Activities page was completely blank.

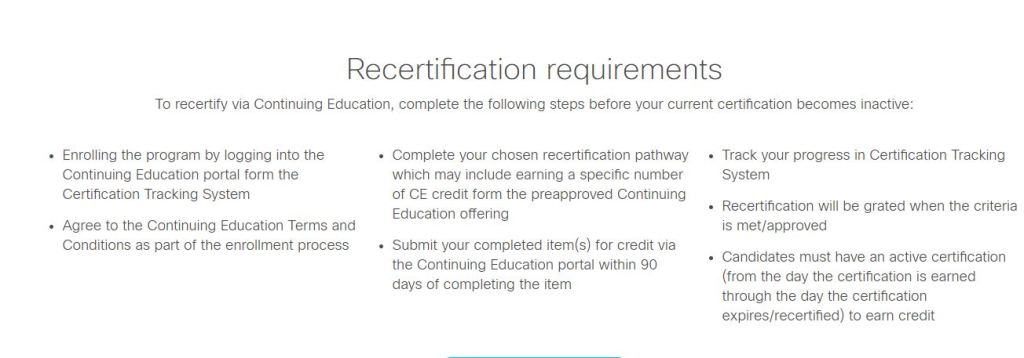
My search took me to https://www.cisco.com/c/en/us/training-events/training-certifications/training/continuing-education-program.html, which is Cisco’s training website on continuing education. The import part of the site was listed under their Recertification Requirements.

Big deal right. But, where do I go from here. Which took me to https://ce.cisco.com/#/dashboard, which showed my Cisco certificates that were current as well as a CE credits summary, which was a gray empty wheel.

If you get anything out of this, this what you need to know. Once you visit the https://ce.cisco.com/#/dashboard website and login with your Cisco credentials, you have enrolled in the Cisco CE program. Even better, they give you a catalog of approved Cisco courses with credit hours that will go towards your certifications. It was pretty easy to do.

EXAMPLE:

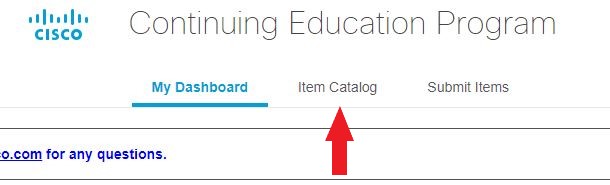
As an example, I decided to try a distance learning class to see how it worked. I clicked on the “Item Catalog” at the top of the page.

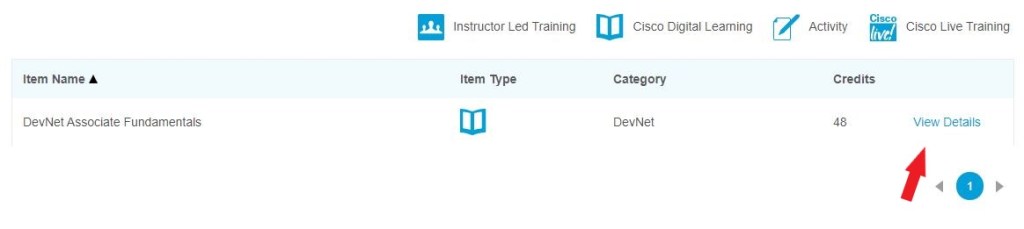
Once in the Catalog page I started typing the first three letters of a popular Cisco program like DevNet. And it auto-populated the DevNet Associate Fundamentals course. Then hit the “Search” button to the right of the search fields. It will fine tune what’s visible just below that. Once there hit the “View Details” option to the far right of the course.

Note to the above image: each dictates what medium each course is taught in. For example the DevNet course I selected is a Cisco Digital Learning medium, which means its an online offered class.

Next hit the “View Details” option to the right of the course again.

That will take you right to the Cisco Certified DevNet Associate website training course and you can login from there.

Once you finish the class, if you choose to enroll, you can submit your course completion certification at the https://ce.cisco.com/#/dashboard website by selecting the “Submit Items” option at the top of the page. In about 24-48 hours later you will get an email stating whether or not the provider has approved your application for Continuing Education credits.

I worked through the above class over the course of a week, about 7 days, off and on. About 24 hours after I submitted my certification for CE credit, I got a approval response to my email that I have my Cisco account registered to. With just 48 credits from that class, my CCNP, which I recertified in August of 2019, which had just over 800 days listed on my CE dashboard before I started the course, now had 1050 days to expire. The course renewed my certifications from the date the course certificate was awarded.

For those of you who struggle through which test to take to renew your Certificates, this a game change.

Thanks for reading and I look forward to your comments.

Shane

STIGs: For Your Home? Really?

INTRO: I used a little bit of humor with the title because many of peers will read it and groan and ask “why in the world would you put you and your network through this hell!” Well, I have to tell you, after dropping a Splunk server on my network and letting it grab up all of my logs, I was pretty happy.

First STIG stands for Security Technical Implementation Guide and they are published by DISA. For those few followers of mine who have never heard of DISA; it stands for Defense Information Systems Agency and are the ISP for the DoD.

Okay, there are almost 500 STIGs on the https://public.cyber.mil/stigs/downloads/ website and I am sure the list can be very daunting. For my original network, I decided to use only just a few vendor specific STIGs and not a lot of the management STIGs. My focus is purely securing my network and STIGs are the best I have seen.

NOTE: There is no such thing as a truly secure network. In the lesson concerning the bear, “When being chased by a bear, you just have to be faster than the person behind you, to be safe.” Well, its the same with networks. You want to make your network a hard target. A hacker/script kiddy wants to attack the easy target and will hopefully move on from a more secure network.

So, lets look at the STIGs I used to secure my home network. For my router I used the Perimeter Router Security Technical Implementation Guide Cisco :: Version 8. For my switch, which is an older model, I used the Cisco ISO Switch Draft STIG.

When I implemented these STIGs, I broke each section into Category I, II, or III. Really Cat I is a the most critical to Cat II which is not as bad a vulnerability but should be concentrated on once all Cat I’s are remediated. And Cat III, which are the vulnerabilities that have the least impact/criticality.

PART 1 (CAT I’s): Now lets breakdown what I actually applied, as I didn’t apply every guideline because of the impact it had on the network.

V-3012, 3056, 3062, 3143: The first 4 CAT I vulnerabilities really have to do with password protecting the device. Okay, if your still using cisco cisco to log into your router and you use it actively as a gateway on your network, shame on you. Change the default username password on your devices. And one more step is to encrypt your passwords:

For example and in this order:

service password-encryption
!
username name secret 5 $1$geU5$vc/uDRS5dWiOrpQJTimBw/
enable secret 5 $1%mer9396y30d$FDA/292/

If you just do the “username {username} password {password}” command, Cisco IOS, by default, will create a type 7 password, which is a weak reversible algorithm hash. Whereas using the “username {username} secret {password} will set the password to a type 5 hash, which is hashed with MD5 and much harder to crack. Is this important on your home network? Wait until the end you judge for yourself.

V-3164: I did implement the Unicast Reverse Path Forwarding (uRPF) Strict mode on my LAN interfaces. With a lot of talkers on the network that are hard to control like an Alexa, Apple TV, or even a refrigerator, I thought it important to drop all illegitimate addresses coming from the LAN. It did create a bit of data rate overhead on my network but only about 1% or 2% of my full data rate.

Example placed on your interface facing your LAN:

ip verify unicast source reachable-via rx 102

access-list 102 deny ip any any log

Most routers with IOS 15 or higher can take the first command. If your router won’t accept the command it may be time to upgrade from the ios 12 your running.

V-3175, 4582: This one is a bit interesting and can be a bit hard to understand. I did some work on my router trying to see if I can adjust the authentication database that is created when the aaa authentication command is run. Frankly if you use the default command the router or switch will use username and password you configured on the device. If you use any other name but default, you are just changing the name.

Example:

aaa new-model ! aaa authentication login default group tacacs+ local
!
line vty 0 4
exec-timeout 10 0
transport input ssh

Remember if you run this command, the “login” command will drop into your line vty set. Also, it will add about a 30 second authentication time because the device will start looking for a tacacs or radius server every 10 seconds for a count of 3 and then default to the local credentials. You can change the default timeout settings. To be honest I didn’t run this command because my plan to establish a centralized authentication server is a bit in the future.

V-3196, 3210: I didn’t implement SNMP on my network. I don’t have a large enough network that would require an agent to monitor my network. But if I did it would definitely be SNMPv3. Yes, there are bit more command to run to establish. Also, when you do configure it, you have to do both commands or it won’t work.

Example:

snmp-server group GroupName v3 auth access 90
snmp-server group GroupName v3 priv access 95
!
snmp-server user UserName GroupName v3 auth sha {password a} priv aes 128 {password b}

If you do the first set of commands, setting up the group name, you are creating a database that has its own users in it. If you don’t setup a user, you in a sense built a house but no one is living there. You need to run the last command (all one line) to finalize the SNMPv3 configurations. If you do the “show snmp user” command and nothing returns than you don’t have a user configured and don’t have SNMPv3 running.

ACLs

The next few vulnerabilities really dig into establishing access to your network from the perimeter/WAN facing interface. To make it simple on my network I built a network address group called “Bad Addresses” and a port group called “Bad Ports”. The goal was to keep my ACL numbers low.

V-14689: This has to do with blocking the local loopback address network (127.0.0.0/8) from entering your network from the WAN.

V-14690: This deals with blocking link-local addresses, better known as APIPA addresses (169.254.0.0/16).

V-14691: This deals with the Bogon and Martian IP addresses, RFC 5735 and 6598. These IPs have not been assigned to a regional internet registry by IANA. The list includes some Class D and E IP space among other IP addresses that could be routed. These addresses have been designated as a high likely of originating spoofing. When I implemented the full list, it really did a number on my network because I was also using my router as a DHCP server. DHCP uses both 0.0.0.0/8 and 240.0.0.0/4 and hindered any of my clients from pulling IP addresses from the router. To block these from the WAN and not still protect my LAN interface, I had to create another address group called “bad Addresses LAN”.

V-14692: This is your typical RFC 1918 addresses (10.0.0.0/8, 172.16.0.0/12, 192.168.0.0/16). I did block these from into my network but only on inbound from the WAN.

V-15294: Teredo is a tunneling mechanism that allows computer to encapsulate Ipv6 to traverse the IPv4 only networks–most home networks. Not blocking UDP port 3544 can really allow a device to pass unannounced through your network without any inspection.

V-25037: This really says that IOS 12.4 and lower has too many vulnerabilities to be on the network. In this STIG DISA uses PAT as a reasoning, but really there are a lot of services that are enabled on 12.4 and older that have been disabled by default on newer IOS’s .

Next post will be on the CAT II’s I remediated on my network.

pfSense over ESXI 6.7

If you read the previous post then you’ll understand why I changed from a Cisco router to a firewall as my gateway/firewall solution. A couple of notes on how I defended my network with the ISR. I basically used DISA STIGs to write two ACLs based on edge security. I used address groups to block the Bogon/Martian IP addresses, RFC 1913 addresses inbound from the internet, etc. I also used port groups to identify known VPN Legacy ports, and denied all inbound ICMP packets. I was pretty happy at the traffic that I was watching get dropped by my external interface, until I saw my data rate. So, in comes pfSense.

Couple of notes here: I decided to redesign my network, which included addressing, and virtual machine deployments. The latter was more by accident than by design because the address changes broke the relationship between my datastore and my hypervisor.

Those that also understand the significant changes between ESXI 6.0 and 6.5 or 6.7 than you know that the VMWare client is now web based unless you deploy a V-Center Server, and even then its web based. So, there were no distributed switches or LAGPs deployed on the hypervisors. It was straight switches and port groups.

Deployment:

I created the firewall VM with the standard defaults. Didn’t need to add any processors, memory or increased capacity. The big thing to take away from this is the operating system family choice needs be “other” and the OS version needs to be “freeBSD 12 or later versions (64 bit)”.

CPU: 1, RAM: 1024 MB, Hard Disk: 8 GB.

I used the updated ISO from https://www.pfsense.org/download/ using the AMD 64 and the default mirror site. Once the ISO was uploaded to the datastore, I connected the CD/DVD player and used the pfsense iso and made sure the check box for connect on power up was selected. You will get an install menu. I just selected all of the default settings and the appliance deploy.

Truly this a little deeper than I want to go into this. I want to capture what I did on my network to get the pfsense firewall to work. If you need a step-by-step guide to deploying a virtual pfsense firewall Randy Graves of NIC-CITE does a phenomenal job of walking through the process from cradle to grave. You can check it out here https://youtu.be/IDJ0YiNSa40.

My Setup:

I decided to use VLANs and several virtual interfaces instead of just a WAN and a LAN interface. Call it habit or brainwashing; I’ve always used VLANs. I do believe segmenting you network using VLANs is a good way to manage your network, fine tune policies based on types of traffic, and generally a good first step to securing the network. So during the initial pfSense setup and the appliance asks if you want to assign interface, it will ask if you want to assign VLANs, I said yes and configured all of my VLANs tied to the LAN interface.

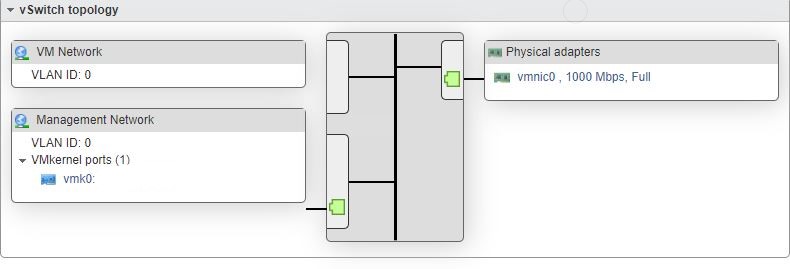
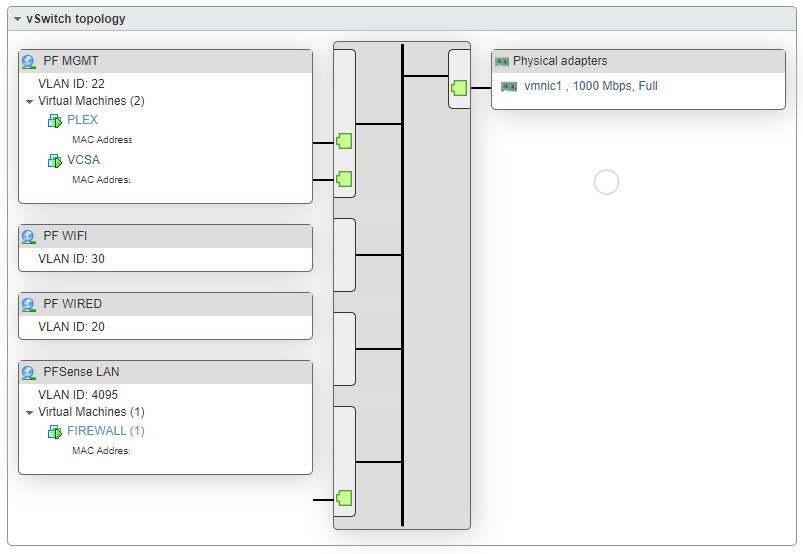
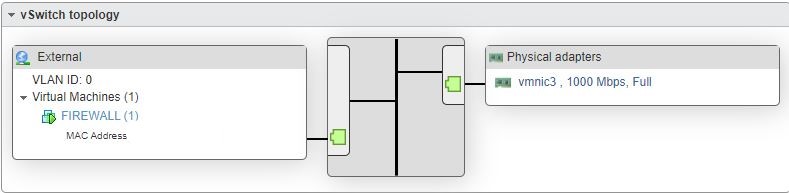
Because the lack of a V-Center server I could not do distributed virtual switching so I had to make three vswitches tied to their own uplinks or vmnic. In a sense vswitch 0 was connected to vmnic0, vswitch 1 tied to vmnic1 and vswitch 2 tied to vmnic 3. Remember, vmnics are tied to the physical interface on the server you are using as your ESXI host. The pictures below give a good break down of my vswitches and port group setup.

vSwitch 0
vSwitch 1
vSwitch 2

If you noticed the VCSA server in the second image, its because I deployed one after I had my firewall up and running.

The gateway for all of my appliances to include the host server for ESXI is on VLAN 22. I had quite a hard time figuring out how to get a trunk down to my physical switch and still maintain access to ESXI. The setup above is finally how I got it working. I had to use one connection for ESXI management, one for the trunk port going to the LAN interface of the firewall, and the last is a segmented external port that goes right into my ISPs mode/router.

Yes, this took an entire Saturday to accomplish and I have to give a lot of credit to Matt Medeiros for giving my phone support when I needed it.

Enjoy and I hope this helps someone else who is in need.

Home Network Updated

Interesting on how money can motivate you to dig into even issues on your personal network. Because I was paying for my ISP’s gigabit service and wasn’t getting the full data rate I decided to start troubleshooting. If you read my initial post on my description of my home network then you are familiar with my setup. Well it has changed drastically.

Problem: On the old setup I was only getting about 125-180 Mbps down and 125-160 Mbps up.

Blame 1: I was using Netgear’s power line adapters to establish layer 1 to the ISPs Fiber Optic Modem in another room in the house. It is well understood that power line adapters only work at an optimal speed if they are on the same circuit. They were not.

Fix 1: I ran a CAT 5 through the wall from the room with the FOM to the room with my server equipment without the power line adapters in place.

Result: Absolutely no change in performance and throughput. I was frustrated to say the least.

Blame 2: My Cisco ISR 1100 was eating my data rate and throughput. The configs are rather simple on this device and it is really running the NAT environment. I did use port groups and address groups to cut down on the ACL entries through the device. I also verified that all ports were hard coded as speed 1000 (Mbps) and full duplex. There has been known issues that crop up every once in a while with the interface auto settings.

Troubleshooting 1: I decided to see if the performance changed if I removed the ACLs from both the internal and WAN facing interfaces. There was a noticeable improvement, but only about 20-30 Mbps down and up. I was still not hitting the full 1 Gbps data rates that I was paying for.

Troubleshooting 2: I hung my laptop off of one of the interfaces on the ISP’s modem/router to verify I was indeed getting what I was paying for and I was. Note, I should have started with this first but I wanted to get the power line adapters out of my network anyway due to loss of sync issues they have had in the past.

Fix 2: I decided to install a PFSense Firewall on my server and add a portgroup and vSwitch and tied it to another vmnic to connect to the ISP’s modem/router. Once I had all the sub-interfaces configured on the firewall and DHCP servers started on the wired and WiFi network my data rate and throughput shot through the roof.

Next Blog will be my documentation of a Saturday spent installing and configuring my PFSense Firewall on my ESXI 6.7 hypervisor.

Enjoy and I look forward to your comments.

My Plex Server Problem: Solved

For those of you utilizing NAT on your home network–a challenge for the CLI.

Once I was able to finalize the setup of my Plex Server and connect it to my Synology NAS everything looked great, except one issue. That issue was external access outside of my home network. The best part of Plex is being able to watch your movies and TV shows away from home.

Because of my experience as a Cybersecurity Engineer experience (my first post Army Retirement gig), I put all kinds of Access Control Lists (ACL) on all the interfaces of my Cisco Router. That being said and because Plex utilizes TCP 32400 primarily, I thought it was my ACLs blocking access. I will create a new BLOG post on my ACLs what they do later.

True Problem

  • I am running PAT on my router.
  • All devices that require outside access really don’t like PAT

The Solution

  • Adding a static PAT
  • Configuring Plex to use a manual public port

First the router:

The following commands are an assumption that you have already built your NAT source and destination overload commands and built your NAT ACLs.

You need to enter the following command to apply static NAT for Plex:

ip nat inside source static tcp {plex server ip address} 32400 interface {public facing router interface} 50000

The above is all one line and the {} require your information.

On the Plex Server:

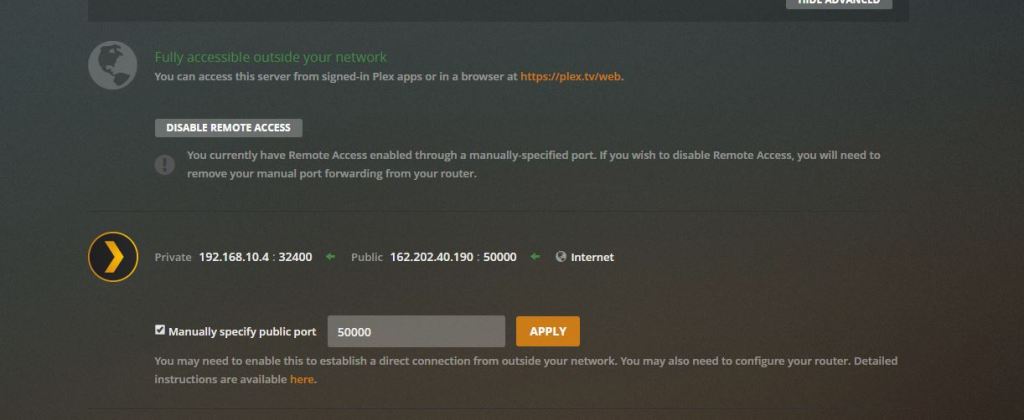
  • Login to your local Plex and go to Settings > Remote Access
  • Select the box next to “Manually specify public port”
  • Enter 50000 select Apply
  • Next to the World icon you should get a searching wheel and a green “Fully accessible outside your network”
  • Test by using your smart phone, not connected to your home network.