If you read the previous post then you’ll understand why I changed from a Cisco router to a firewall as my gateway/firewall solution. A couple of notes on how I defended my network with the ISR. I basically used DISA STIGs to write two ACLs based on edge security. I used address groups to block the Bogon/Martian IP addresses, RFC 1913 addresses inbound from the internet, etc. I also used port groups to identify known VPN Legacy ports, and denied all inbound ICMP packets. I was pretty happy at the traffic that I was watching get dropped by my external interface, until I saw my data rate. So, in comes pfSense.
Couple of notes here: I decided to redesign my network, which included addressing, and virtual machine deployments. The latter was more by accident than by design because the address changes broke the relationship between my datastore and my hypervisor.
Those that also understand the significant changes between ESXI 6.0 and 6.5 or 6.7 than you know that the VMWare client is now web based unless you deploy a V-Center Server, and even then its web based. So, there were no distributed switches or LAGPs deployed on the hypervisors. It was straight switches and port groups.
Deployment:
I created the firewall VM with the standard defaults. Didn’t need to add any processors, memory or increased capacity. The big thing to take away from this is the operating system family choice needs be “other” and the OS version needs to be “freeBSD 12 or later versions (64 bit)”.
CPU: 1, RAM: 1024 MB, Hard Disk: 8 GB.
I used the updated ISO from https://www.pfsense.org/download/ using the AMD 64 and the default mirror site. Once the ISO was uploaded to the datastore, I connected the CD/DVD player and used the pfsense iso and made sure the check box for connect on power up was selected. You will get an install menu. I just selected all of the default settings and the appliance deploy.
Truly this a little deeper than I want to go into this. I want to capture what I did on my network to get the pfsense firewall to work. If you need a step-by-step guide to deploying a virtual pfsense firewall Randy Graves of NIC-CITE does a phenomenal job of walking through the process from cradle to grave. You can check it out here https://youtu.be/IDJ0YiNSa40.
My Setup:
I decided to use VLANs and several virtual interfaces instead of just a WAN and a LAN interface. Call it habit or brainwashing; I’ve always used VLANs. I do believe segmenting you network using VLANs is a good way to manage your network, fine tune policies based on types of traffic, and generally a good first step to securing the network. So during the initial pfSense setup and the appliance asks if you want to assign interface, it will ask if you want to assign VLANs, I said yes and configured all of my VLANs tied to the LAN interface.
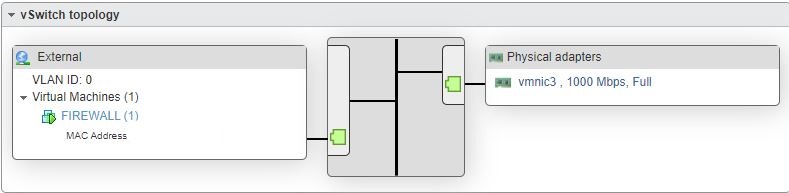
Because the lack of a V-Center server I could not do distributed virtual switching so I had to make three vswitches tied to their own uplinks or vmnic. In a sense vswitch 0 was connected to vmnic0, vswitch 1 tied to vmnic1 and vswitch 2 tied to vmnic 3. Remember, vmnics are tied to the physical interface on the server you are using as your ESXI host. The pictures below give a good break down of my vswitches and port group setup.
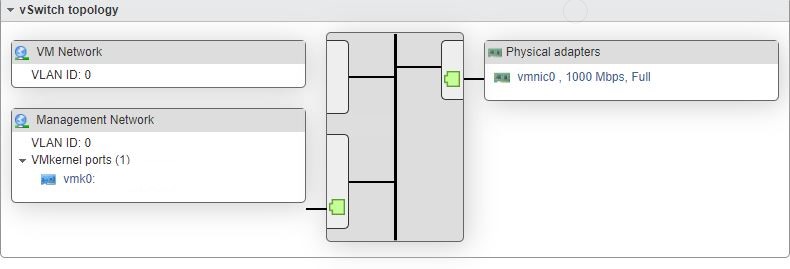
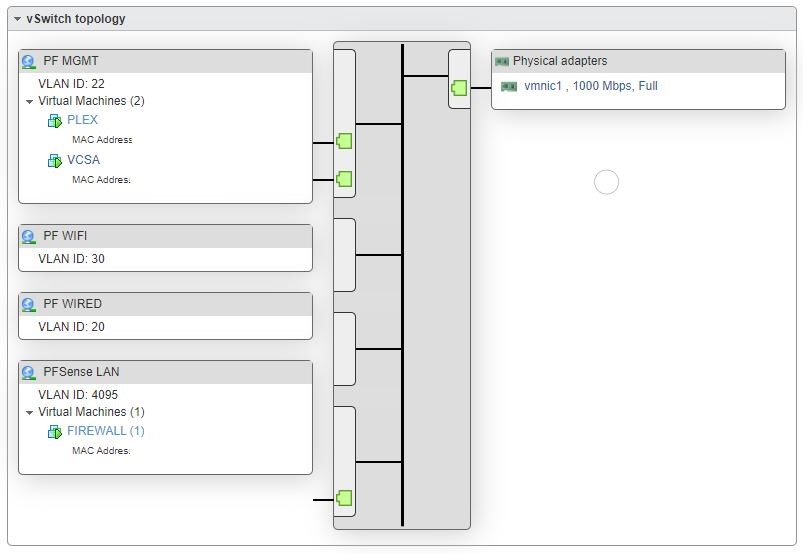
If you noticed the VCSA server in the second image, its because I deployed one after I had my firewall up and running.
The gateway for all of my appliances to include the host server for ESXI is on VLAN 22. I had quite a hard time figuring out how to get a trunk down to my physical switch and still maintain access to ESXI. The setup above is finally how I got it working. I had to use one connection for ESXI management, one for the trunk port going to the LAN interface of the firewall, and the last is a segmented external port that goes right into my ISPs mode/router.
Yes, this took an entire Saturday to accomplish and I have to give a lot of credit to Matt Medeiros for giving my phone support when I needed it.
Enjoy and I hope this helps someone else who is in need.
